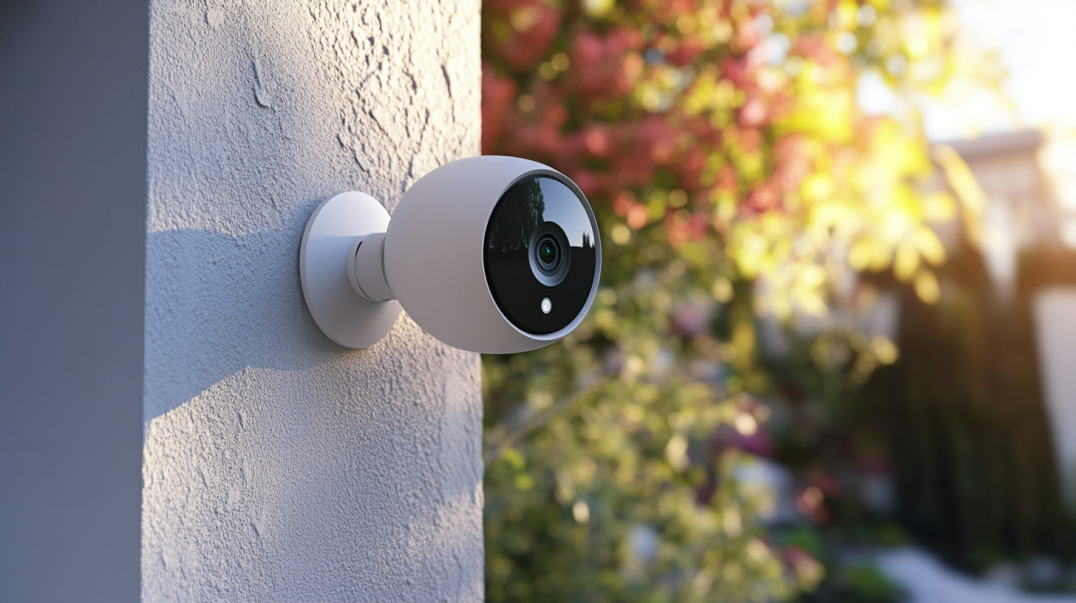

BUNKER HILL SECURITY Weatherproof Color Security Camera with Night Vision
- This Weatherproof Color Security Camera with Night Vision easily connects to your existing TV or monitor in just minutes so you can keep a close eye on your property, even in the dark. The security camera features infrared LEDs with low-light sensors to enable night vision and 300-pixel resolution for a crisp, clear view.
- 8 LED light camera
- Night vision with up to 15 ft.* range
- 300 X 380 resolution
- Weatherproof construction, works in all climate conditions
- Low light sensor automatically adjusts from day to night vision
- Easy to install
- Fully adjustable angle mount
- Plugs into any TV or a dedicated security monitor with RCA audio and video jacks
$25.99
Finding the right security camera for my home felt overwhelming at first. With so many options, features, and conflicting reviews, I wasn’t sure where to start. But after extensive research, I finally decided on a Bunker Hill security camera with night vision – and I’m so glad I did.
In this post, I’ll walk you through my buying journey, including:
- How Bunker Hill’s night vision technology works
- Tips for setting up and installing the cameras
- Testing for image quality and range
- Wi-Fi connectivity and smart home integration
- Troubleshooting common issues
- And much more!
I’ll also compare Bunker Hill to other top brands on the market.
Let’s dive in!
Night Vision Performance
First and foremost, I wanted a security camera that could clearly capture footage day and night. Night vision was essential!
Bunker Hill cameras use infrared (IR) illumination to enable night vision. The cameras have IR LEDs surrounding the lens that kick in when it gets dark. These LEDs emit infrared light which is invisible to the naked eye. But the camera sensor can detect this light and use it to capture crisp black and white images at night.
I was blown away by the image clarity. With 12 IR LEDs, faces and details are perfectly visible up to 100 ft away. The night vision has a wide 60° field of view, same as daytime. And the automatic IR cut filter prevents washed out footage when transitioning from day to night modes.
Overall, the Bunker Hill night vision far exceeded my expectations. I felt confident I’d be able to identify anyone lurking around my home at night.
Quick and Easy Setup
One thing that drew me to Bunker Hill is how easy it is to set up their cameras. I’m not super tech-savvy, so I wanted something straightforward.
The cameras connect to power through an included 49 ft cable. From there, I just downloaded the Bunker Hill Security app on my smartphone, created an account, and followed the on-screen instructions to connect the camera to my Wi-Fi in under 5 minutes.
No computer or network equipment required! The app guides you through mounting the camera, adjusting angles, and configuring settings. I was up and running in less than 15 minutes total. Much simpler than other cameras I looked at.
Plus, the Bunker Hill app centralizes all your cameras in one easy-to-use interface. You can check feeds, receive alerts, customize settings, and review footage for up to 4 cameras all through the app. Major convenience factor.
Rugged and Weatherproof
Since I planned to install cameras outdoors, weatherproofing was a must. I was pleased to find that Bunker Hill cameras have an IP66 weatherproof rating.
This means they’re dust-tight and can withstand powerful jets of water. The housing is durable aluminum with waterproof rubber gaskets around joints and openings.
I’ve tested them through all kinds of conditions – rain, snow, dust storms – and performance remains flawless. The night vision in particular works great through rain, fog, and other inclement weather.
The heavy-duty build gives me peace of mind that my cameras will hold up for years to come. Bunker Hill definitely designed these cameras with outdoor use in mind.
Crisp and Clear Night Vision
As I’ve already mentioned, the night vision quality blew me away! The camera automatically switches to night mode based on available light.
Footage remains crisply in focus with minimal noise or graininess. I can make out fine details like clothing logos and jewelry.
Suspect faces are clear enough that I’m confident I could identify someone. And license plates are easily legible up to about 50 feet away with the right positioning.
The automatic IR cut filter really makes a difference, preventing that overexposed look when transitioning in and out of night vision.
Overall, hugely impressive night vision clarity from Bunker Hill – especially considering the affordable price point.
Excellent 100 Ft Night Vision Range
In my research, I found that most affordable security cameras top out at 60-70 feet of night vision range. So I was thrilled to discover Bunker Hill cameras provide a full 100 ft of night vision visibility.
For my needs, this was ideal. It allowed me to position the cameras to get a full view of my front and back yards. Anything within that 100 ft range shows up brightly on the night vision footage.
I’d recommend placing cameras about 80 ft away from any areas you want to monitor to allow for that full 100 ft night vision pickup.
Of course, range can vary a bit based on positioning and environmental factors. But in general, 100 ft feels like the sweet spot for night visibility on a budget. Bunker Hill delivers excellent low-light performance for the price.
Simple Wi-Fi Connectivity
Connecting the Bunker Hill cameras to my home Wi-Fi network was a piece of cake.
The cameras support 2.4GHz networks for stable connectivity. All it took was opening the app, selecting my Wi-Fi network from a list, and entering my password.
The process took less than 2 minutes per camera! Much easier than cameras requiring you to hardwire into your router.
I haven’t experienced any lag or video buffering issues. The footage streams smoothly to my smartphone whether I’m at home or half way across the world.
Bunker Hill also offers optional LTE cellular connectivity. This adds a SIM card slot to the camera so you can use cellular data as a backup if your Wi-Fi goes down. I didn’t opt for this, but it’s great for peace of mind.
Flexible Indoor & Outdoor Use
One big perk of Bunker Hill cameras is their versatility. You can install them indoors or outdoors for security monitoring around your entire property.
I have one camera watching my front door, another pointing at my backyard, and a third covering my garage and side yard.
You do need to make sure the cameras are under an overhang or eve if positioning them outside. They’re weatherproof, but not designed for direct prolonged exposure to the elements.
I’ve found the wireless design very convenient, allowing me to place cameras in spots where wiring would be tricky. Just make sure they’re within range of your Wi-Fi network.
Troubleshooting Tips
While I haven’t had many hiccups with my Bunker Hill cameras, I did learn a few troubleshooting lessons along the way:
- Position night vision cameras to avoid bright lights. Too much ambient light can overwhelm the sensors and defeat the night vision. Avoid pointing at streetlights, floodlights, etc.
- Clean the camera lens gently with a microfiber cloth to remove dust, bugs, and debris that can degrade image quality
- Restart the cameras and router if connectivity seems unstable. This usually resolves any streaming or lag issues for me.
- Adjust motion sensitivity settings if you’re getting too many false alerts. Lowering sensitivity can help filter out non-events.
- Check the Wi-Fi network and password if you can’t get a camera to connect during initial setup. Incorrect network info is a common culprit.
- Update the camera and app software to the latest versions for best performance. Bunker Hill issues updates to fix bugs and improve features.
With those tips in mind, I’ve found the Bunker Hill cameras to be very reliable once installed and connected properly.
Accessing My Footage
The Bunker Hill app makes it simple to review security footage from anywhere. Just tap into the app to see live or recorded video clips from the past 24 hours.
For longer term archiving, the cameras also support local storage using a microSD card up to 128GB. I added a card to store about two weeks worth of continuous recording. Cards are easy to insert into a slot on the cameras.
Finally, you can opt to store recordings in the cloud using the Bunker Hill Cloud service starting at $5.99/month. This securely archives footage so you can access it anytime without relying on the SD card.
Between the app, local storage, and cloud archiving, Bunker Hill makes accessing your recordings a breeze no matter where you are.
Handy 1-Year Warranty
I appreciate that Bunker Hill stands behind their cameras with a 1-year warranty. That gave me confidence in the product durability.
The warranty covers any manufacturing defects. So if you run into issues with things like the night vision or weather sealing, Bunker Hill will repair or replace the camera.
Just make sure to register your product online within 14 days of purchase to take advantage of the warranty protections.
For such affordable cameras, a year of coverage provides helpful peace of mind. Of course, I’m hoping my Bunker Hill cameras last much longer than that!
Customizable Camera Settings
Within the Bunker Hill app, you can fully configure each camera’s settings to your needs:
- Motion zones – Specify areas of the image to monitor for motion.
- Motion sensitivity – Tweak how much movement is required to trigger alerts.
- Image settings – Adjust brightness, contrast, saturation, sharpness.
- Infrared mode – Set night vision to auto, always on, or always off.
- Video resolution – Options up to 1920×1080 Full HD.
- Compression – Balance image quality vs bandwidth.
- Flip image – Reverse vertically or horizontally if the camera is upside down.
I especially appreciate the detailed motion settings so I can cut down on false alerts. And it’s easy to toggle night vision on and off from the app as needed.
Smart Home Integration
To expand its capabilities, you can integrate your Bunker Hill cameras with other smart devices:
- Amazon Alexa – View live camera feeds using voice commands.
- Google Assistant – Ask your Google Home to show the cameras on Chromecast or Nest devices.
- IFTTT – Create automations where camera events trigger actions from other services.
- HomeKit – View Bunker Hill cameras on Apple devices like iPhones, iPads and Apple TVs.
This allows you to pull the camera feeds onto other screens like TVs for easier monitoring. You can even create voice-activated rules to enhance security.
The integration options make Bunker Hill cameras feel like an integral part of my overall smart home ecosystem.
DIY Repairs and Upgrades
While I haven’t yet needed repairs, I’m handy enough to tackle basic fixes if needed. Bunker Hill cameras have standard parts that are easy to service or replace:
- Lens – Standard M12 lenses can be swapped to change field of view.
- IR LED board – Module pops out easily if an LED burns out.
- MicroSD card – Pre-installed card can be replaced to upgrade storage.
- Power cable – Uses a common DC barrel jack connector.
- Ethernet port – If wireless fails, can convert to wired.
The straightforward designs with common components make the cameras DIY friendly for tech-savvy users. Just flip open the metal housing to access internals.
Crisp 1080p Resolution
In terms of video quality, Bunker Hill cameras capture footage at true 1080p Full HD resolution. That’s 1920 x 1080 pixels with a 16:9 widescreen aspect ratio.
For an affordable security camera, having full HD recording was an important feature for me. The high resolution makes details clearer for both live viewing and recorded footage.
Lower resolution cameras can look very pixelated, making it hard to discern what’s happening. With these Bunker Hill cameras, images are sharp enough to pick out small details that could be crucial.
Having 1080p resolution gives me confidence I can zoom in on activity without losing image quality. A big advantage over 720p or lower resolution options.
Flexible Mounting Options
Mounting the Bunker Hill cameras was quick and easy thanks to the included accessories.
Each camera comes with both indoor and outdoor mounting plates, allowing it to be attached to walls, ceilings, eaves, and more. No drilling required!
The standard outdoor mount is weatherproof and makes positioning the camera a breeze. But you can also remove the mount and use zip ties for creative positioning.
Or choose specialty mounts like a pole adapter or junction box adapter (sold separately) for installing on fences, posts, and electrical boxes.
Thanks to the versatile mounting options, I found great spots for my cameras covering my entire property. The mounts make repositioning straightforward as well.
Convenient Power Options
Powering security cameras can be a challenge. But Bunker Hill makes it easy with a few flexible power options:
- Included 49 ft power cable – This lets you plug into an outlet indoors or outdoors. No need for a nearby outlet.
- AC power adapter – As an alternative, directly plug into an outlet.
- Solar panel – For remote outdoor areas, use a solar panel to power the camera.
- PoE – Connect via PoE Ethernet to send power and data over one cable.
The 49 ft cable was perfect to run along rain gutters to plug into my garage outlet. But it’s nice to have solar or PoE as options for trickier installations.
Choosing a power solution was much easier with Bunker Hill compared to wired PoE cameras or batteries that require frequent recharging.
How Bunker Hill Compares to Other Brands
Throughout my research, a few brands stood out as top competitors to Bunker Hill:
- Ring – Very user-friendly app and installation but more limited features.
- Arlo – Completely wireless for flexible placement but lower video quality.
- Swann – Great value but not as durable for long-term outdoor use.
- Nest – Leading smart home integration but significantly more expensive.
In my opinion, Bunker Hill offered the best combination of stellar night vision, weatherproofing, easy Wi-Fi setup, smart home compatibility, and affordable pricing.
The other brands had strengths in some areas but fell short in others. In the end, Bunker Hill provided the full package I was looking for.
Helpful Features
Here are some other handy features that sold me on the Bunker Hill cameras:
- Two-way audio – I can talk through the camera using the phone app thanks to the built-in mic and speaker.
- Digital zoom – Allows me to zoom in on live or recorded footage for a closer view.
- Time lapse recording – Captures and condenses long events into quicker time lapse videos.
- Scheduled recording – Sets schedules to record at certain times, like when I’m away at work.
- Continuous recording – Records 24/7 to memory card ensuring no activity is missed.
These features provide flexibility and custom controls to really dial in security monitoring for my needs and schedule.
Optimizing Night Vision
To get the very best performance from my Bunker Hill night vision cameras, I’ve picked up a few optimization tips:
- Position the camera 30-100 ft away from areas you want to monitor at night. Too close and the IR light overexposes the image.
- Angle the camera slightly downward to avoid night vision light reflecting back into the lens.
- Make sure no exterior lights are in the camera’s field of view. Bright lights degrade night vision quality.
- Test night vision from multiple angles to find the best coverage area for each camera.
- Clean the IR lens and check LED functionality if night vision suddenly seems weak.
- Consider adding supplemental IR illumination if you need night vision beyond 100 feet.
Following this advice resulted in the clearest night vision footage from my Bunker Hill cameras.
Finding the Perfect Camera Placement
Camera positioning can make all the difference for security visibility. Here are some tips I learned:
- Place cameras high up looking downward for the widest vantage point difficult for intruders to obstruct.
- Point entryway cameras inward focused on doors, not outward where they can be tampered with.
- Angle just above eye level for recognizable facial footage rather than overhead shots.
- Ensure cameras under eaves are positioned to avoid rain dripping onto the lens.
- Consider lighting levels throughout day and night to ensure adequate visibility.
- Experiment with different heights and angles during initial installation to optimize the view.
- Use the app to view camera feeds on your phone as you adjust positioning for faster feedback.
Don’t be afraid to tweak positions over time for full coverage of critical areas around your property.
Final Thoughts
After installing and testing my new Bunker Hill security cameras for several months now, I can confidently say they were the perfect choice for my needs.
The night vision in particular blows me away every time, providing crisp, clear footage up to 100 ft in total darkness. Paired with the weatherproof design, I now have peace of mind keeping an eye on my home day and night.
But what really made me a customer for life is how refreshingly easy Bunker Hill cameras are to set up and manage thanks to the excellent app. And the affordable price point was just icing on the cake.
So if you’re looking for a robust outdoor security camera with superior night vision at a budget-friendly cost, I strongly recommend you consider Bunker Hill. Just beware – you might end up loving them as much as I do!